handmade

{new work} with Happinez...

It’s been a while since I’ve updated my published work here on the journal. There has been so much going on in the world and in our own personal lives - not just mine, everyone’s, everywhere. I won’t get into it, I need a break, we all need a break. So I’ve set myself the task to update this journal space with the work I’ve done with Happinez these past 6 months, and then I am aiming to get back into online journalling, with the hope to get a rhythm and flow with writing and sharing.

This visual story was special - I know I probably say that for all of them! And it’s true, they are all special, but I’ll explain what made this one special for me…

These photographs were featured in the Happinez Astrology edition, and the brief was to create and photograph six ideas that readers could make astrology-inspired objects. I shot it back in June 2021, so I had the beautiful soft Australian winter sunlight to play with. The reason this particular visual story is special is because it features so many of my friend’s incredible creations.

I commissioned Kaspia to make three of the ideas and I love what she made! I also shot two of the photographs at her house. Above, she is modelling the zodiac sign talisman necklaces she made - her beauty knows no bounds. And below, she made this gorgeous hand-stitched moon & stars embroidery hoop which nestled so well on the shelf in her sunroom…

I wanted to make this visual story dreamy. I loved playing around with the light and layers.

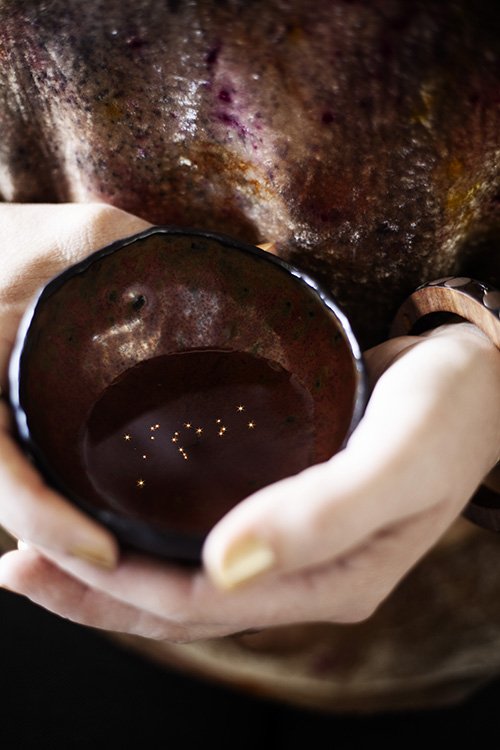
It’s such a pleasure to be able to work with the creation’s my friends make. This unique drinking vessel is made by Nat, using clay from the land she calls home, on Moorang Moobar Country, nestled into Wollumbin National Park. I added the stars inside the tea cup to symbolise the magic of drinking tea under the stars. But I also loved the idea of creating a constellation in the base of a tea cup - would any claymakers out there like to create this idea? If so let me know!

I am holding the cup - and taking the photograph - yep I like to make work challenging sometimes. It’s mostly because I come up with the idea and no one else is around so I have to figure out how to do it with what I have. It’s also a good reason to paint my nails gold.

The stunning top I am wearing? This is made by textile designer Joanne Broederlow. I urge you to check out her offerings, they are incredible, I’ve got a growing collection of her wearable art and I love using her textile creations for my photographs.

I created these zodiac rocks by borrowing some of the amazing fallen rocks on the beach of Broken Head near where we live. The colours of the rocks are amazing - rich red, yellow and orange. I used gold leaf to create the zodiac signs, and photographed them on my studio floor, with dried grass and water splashes to create different textures. After the photoshoot, Laly and I carried the rocks back to the beach and placed them around for beachcombers to discover. I wondered who might spot the gold shimmer and wished upon the stars for the discoveries to create some magic in their day.

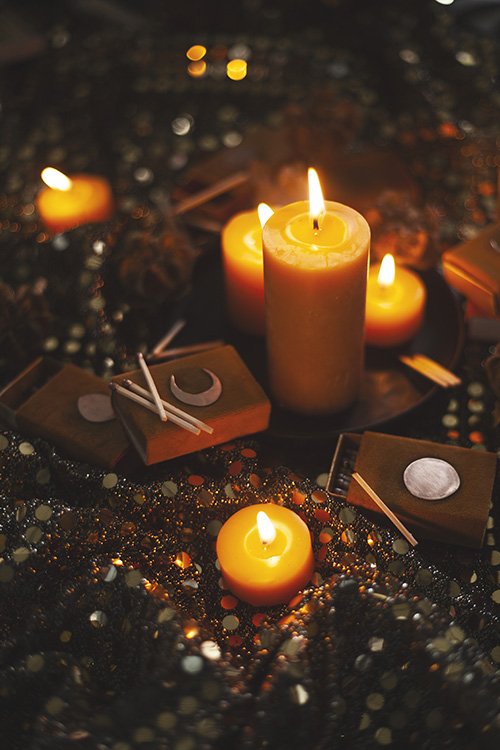
Kaspia made these gorgeous little matchstick boxes with tiny copper moons and vintage gold velvet. Can we not reimagine matches this way, dipped in copper-coloured posphorous sulfide?

The shimmery fabric I’ve had in my textile stash for as long as I can remember - I think it was in mum’s collection, maybe she had an idea for it, I wonder what, I’ll never know.

And the last photograph in the story is this one above - creating a journal for your planetary learnings. I was so happy to be able to showcase Sam Mackie’s gift to me, her hand-bound Everyday Alchemy book which I absolutely cherish. Have a look here for more of her book creations and you can see her photographs here. I added a golden moon bookmark - I made it by wrapping some gold foil from my snack-time chocolate bars (yes I save all the gold foil and have a big pile of it for projects!) around a cardboard disc, then attaching some gold thread to it, and a pink stone pendant. The background is Jo’s hand-dyed velvet garment, the same as the one I’m wearing in the previous photograph - dreamy.

The gold moon you may have noticed, is my symbol - I use it everywhere. In my next book, you’ll find out what it means to me.

I hope you enjoyed this visual story and the stories behind the visuals! As always it was so much fun to create. Thank you to all the makers who I featured, you’re all amazing and I love that we can all inspire each other in our creativity, it’s truly what makes the world go around!

With love,

Pia

Would you like more? You can:

Listen to the podcast

Read my archived blog when I lived in Amsterdam & Paris

Join The Everyday Alchemists

Subscribe to my newsletter


All Natural Playdough (original post from 2014)

PJB_photoplaydoughrecipe.jpg

Looks like it’s been 6 years since I’ve made playdough! This recipe is from my original blog, and Laly asked me the other day if we could make some, which we will do this week. I remember the colours being so vibrant, so I’m looking forward to trying this out again.

I thought I’d repost it here so it’s easy to find.

Here is the original post…

February 4, 2014 (Laly was almost 2 years young):

So I've been having a bit of fun making all natural play dough lately. This batch of coloured fun is my third or so experiment and I'm rather happy with it. Though I've got some ideas for the next batch which I'll share with you in case you'd like to try.

Since I want to use only natural colour, I've adapted this recipe from best recipes, minimizing quantities and introducing soaking selected ingredients to create coloured water. Here is my adapted recipe:

1 cup plain flour
1/2 cup salt
1/2 tablespoon (or so) of cooking oil (i've been using sunflower)
1/4-1/2 cup of cold, coloured water

To make the coloured water, soak a handful of your chosen ingredient (spinach for green, beetroot for deep purple, mixed frozen berries for rose/light purple) in a ramekin or glass container of 1/2cup water, preferably overnight. Strain the liquid and pop it in the fridge for a little while to make it cold, or add an ice cube.

In a large bowl, mix the flour and salt together well. At this stage if you are making yellow, add a good sprinkling of tumeric powder. Then add the cooking oil and 1/4cup of coloured water. Mix then knead until well combined. Add more water if needed to get the right consistency.

....................................................

I then put each ball of play dough into clear, recycled plastic containers and leave them in the back of the fridge. To allow them to soften slightly, I take them out about 1/2 hour before we are ready to play with them  (yes, WE - Laly and I both love playing with play dough - yesterday I made a fantastic collection of funny looking dinosaurs which Laly promptly invited all to a tiny tea party). This batch was a little crumbly when I took them out, so I just added splashes of water and kneaded them a bit more and they were perfect. Adding flour and water makes playing with it all the more fun for Laly, so I don't mind if I don't get the consistency spot on when I make them. And yes, the colours do come off ever so slightly when you play with them, but barely - and honestly, who cares? It washes off with a dab of a cloth.

The other thing I'd like to say is that I soaked beetroot skins in some water overnight, hence the gorgeous intense colour. However I didn't soak the spinach or the mixed berries but next time I will to get more intense colour, though if you like it subtle, soak for less.

My last batch of yellow and rose lasted many months - basically until the colours get all smooshed together and the ball diminishes to a tiny size, as happens when little hands get hold of it.

I hope you'll give this a try. I can't wait to try out more ingredients for more colours!  Any suggestions?

xx


new work: unique symbols of friendship for happi kids...

wax drawing with watercolour as message: give someone a secret message that they have to discover by painting over the top of it: A beautiful version of those secret message pens that children have.

wax drawing with watercolour as message: give someone a secret message that they have to discover by painting over the top of it: A beautiful version of those secret message pens that children have.

Loved creating this collection of photographs for the Autumn edition of Happi Kids which is well and truly out now in The Netherlands! The story is all about ways of expressing friendship and love. I’ve captioned each image so you can learn more about the ideas in the visual storytelling. I love how conceptual this is, and how the focus is once again not on purchasing things but creating things - making something from ‘nothing’, truly alchemical in process, it’s what I love doing! Aside from the backdrops and a few little props, everything in each image are from objects and foliage around my home. Each tells a story within a story.

a new take on the family tree - select a beautiful branch and add photos as well as significant textiles and objects that tell stories. It can be added to over time to create a stunning feature in your child’s room.

a new take on the family tree - select a beautiful branch and add photos as well as significant textiles and objects that tell stories. It can be added to over time to create a stunning feature in your child’s room.

I especially loved creating this photograph, because the three women in the polaroids are my grandmother (top left), my mother (middle left) and me with my mother in the bottom polaroid. My grandmother died earlier this year, and my mother passed away four years ago. Creating this tree was a beautiful way to reflect on the gift of life and how I now share that with my daughter. I added the emu feathers as the emu is a significant symbol for my daughter, and there is a piece of indigo-dyed textile made by my dear friend Nat. Messages, memories and stories can be written on pieces of card and hung over time to create layers of meaning.

The Native Indian symbol of friendship which you can paint in red as the colour of connection, love, and strength on each other’s hand.

The Native Indian symbol of friendship which you can paint in red as the colour of connection, love, and strength on each other’s hand.

PiaJaneBijkerk_HappiKids_DIYFriendship_autumn2019_redsymbol_IMG_7576.jpg
The friendship necklace - find a little bottle and fill it with tiny treasures and a miniature note telling your friend what you love about her. Attach a piece of string and gift it to her any day of the week. Or you could make each other one as a g…

The friendship necklace - find a little bottle and fill it with tiny treasures and a miniature note telling your friend what you love about her. Attach a piece of string and gift it to her any day of the week. Or you could make each other one as a gift for Christmas. My wonderful stylist assistant and model in the above images is my daughter Laly, standing in the dappled sunlight in our back garden.

Friendship code stones - do you and your friend live in the same neighbourhood, and walk the same streets but go to different schools? Gather a bunch of stones and create your own symbols for each letter of the alphabet, making sure to double or tri…

Friendship code stones - do you and your friend live in the same neighbourhood, and walk the same streets but go to different schools? Gather a bunch of stones and create your own symbols for each letter of the alphabet, making sure to double or triple up on more common letters. Or create symbols for special words. Be sure to memorise the code or write out the symbols together. Leave the pile of stones in a safe place you both walk past often so that on your way to school or to the park, you can leave each other a message. Ask a question and then find out what they will answer! It’s a beautiful way to connect.

I absolutely loved making these friendship code stones! It’s the best idea, I can imagine kids loving doing this. It would be such a fun thing to do with your own child or grandchild - a collection of coded stones that you can create messages for them to find in places in the garden.


Keys to a special place - this idea got me thinking about the different spaces that could be shared - a treehouse, a beach shack, a creative space. And then I realised that’s what my studio is - a place I share with creative friends who come and sta…

Keys to a special place - this idea got me thinking about the different spaces that could be shared - a treehouse, a beach shack, a creative space. And then I realised that’s what my studio is - a place I share with creative friends who come and stay, it’s truly is a wonderful way to connect!

I really wanted a compass for this photograph, as a way of symbolising direction to each other. I could not find one anywhere on short notice and it was driving me crazy. I sat for a moment of quiet, thinking about the present moment, which lead to me thinking about my family. I wondered how Laly was enjoying her day out with her friend Mya and Mya’s Aunty Tash, who lovingly takes the girls out on fun adventures together. I thought about their day out on this particular day, as Tash had taken them to the Maritime Museum. I wondered what they might be doing, and if they were on one of the ships, or were they looking in the shop? Then it dawned on me: they are at the Maritime Museum!! Surely there are compasses there! I called Tash to ask and when she got to the shop., they took a photo for me - there were over 3 dozen beautiful, old style compasses to choose from! I couldn’t believe my luck, I would never have thought of the Maritime Museum if the girls were not there at that very moment. So Tash helped me choose the one I wanted for the shoot and Laly brought it back with her. What a successful prop scout! A big thank you to Tash for her input on this photograph, the compass is the star of the shot. The piece of textile is from my friend Nat, who comes to stay in the studio whenever she’s in Sydney. And I realised this is what I have with her, this special bond of sharing my creative space with her.

With love,

Pia xx

New Work: Mud Play for Happi Kids

Laly in her mud pit making a Mud Café…

Laly in her mud pit making a Mud Café…

PIAJANEBIJKERK_HAPPIKIDS_MUD_2019.jpg
A diary of a worm, something we had a lot of fun working on together and included playing with real worms found in the garden.

A diary of a worm, something we had a lot of fun working on together and included playing with real worms found in the garden.

In April this year I got one of the most wonderful photographic story commissions for a magazine I’ve ever had… when I read the phrases in the email “make things with mud”, “kids getting dirty”, “do you love the subject?” I barely held back my excitement and I was quick to reply YES! It ticked all the boxes for me and I couldn’t wait to schedule it in & get thinking on what I could create for this story for the summer issue of Happi Kids.

Do you remember when Laly was around 2 years old, I made her - by hand, spending no money (yes I’m proud!) - a sandpit in our back garden? Here is the post to jog your memory. Well, she’s now a regular beach goer, no longer afraid of the vastness of the ocean and loves ‘surfing’ on her body board. She’d outgrown her mini backyard beach so, inspired by the story for this shoot and in need of the perfect location, I turned the sand pit into a mud pit! I dug out the sand, and collected some buckets of dirt from the back area where our first chickens used to roam (we now have chickens again, but that’s another post for another time! We may live in the city, but that hasn’t stopped us from creating a mini farm it seems). I cleared the area around the pit and planted a few hardy flowers and pretty palms. I needed to create a space big enough for a couple of kids to play in, as well as a painting area. It was a lot of fun to build this set, gathering vintage kitchenware for the mud cafe, and mixing mud with beetroot, spinach and turmeric to create mud paint. I spent a glorious hour or two by myself making the tiny mud house (inner child meets grown up job - the best)…

PiaJaneBijkerk_HappiKids_summer2019_mud_house_laly_IMG_7430.jpg
PIAJANEBIJKERK_HAPPIKIDS_MUD_2019_1.jpg

I had three wonderful young models for this shoot. With the fabulous production assistance from my friend Celia, she found two boys from Laly’s school, Zephyr and Luka, who came over with their mums Eliza and Narelle, one afternoon and basically hung out in the mud for 3 hours while I snapped shots of them playing. I only needed 3 hero shots from the boys, but there were many more created, they had so much fun and it was pure joy to capture them in action. I don’t think they could quite believe that this was a real job, and all they had to do was play and cover themselves in mud! Shona was my styling and photography assistant for the afternoon, so it was certainly a relaxed and joyful shoot…

Zephyr painting with mud!

Zephyr painting with mud!

Luka and Zephyr following my instructions to get dirty!

Luka and Zephyr following my instructions to get dirty!

The boys making ‘dirty denim’ with some op shop denim clothes I sourced for the shoot.

The boys making ‘dirty denim’ with some op shop denim clothes I sourced for the shoot.

Luka loved making mud ice creams.

Luka loved making mud ice creams.

Zeph covered in mud and pretty happy about it!

Zeph covered in mud and pretty happy about it!

At the end of the shoot, while Zephyr’s mum Eliza was hosing him down, I saw him look up at his mum and say “I will never forget this day!”. My heart exploded.

The next day was Laly’s turn, and she took on her role with not just enthusiasm but surprising skill, as she doubled as my photographic assistant as well, helping me set up certain shots and gathering materials, and restyling the props when needed. This is the first time she’s worked with me or seen me work as I have only ever brought her with me to a shoot once - when she was 6 months old, and it was a disaster, so I never did it again! Until now, at 7 years of age. She was so great, and I think I may have myself an ongoing assistant for as long as she finds joy in it! I’ve noticed she’s a natural behind the camera actually - she took a video of her friend the other day singing, and I couldn’t believe how still she kept the camera and how she followed her friend around, patient and mindful of how she was placed within the frame - there were even natural light flares from the sun, it was like a professional film, I couldn’t believe it! I’ve never taught her so I was pretty blown away - let’s just say she gets that from me, because as we know, it’s not one of Romain’s many talents.

Mud sandwich anyone? A bit of stale bread and some pretend ‘micro herbs’, yum!

Mud sandwich anyone? A bit of stale bread and some pretend ‘micro herbs’, yum!

PiaJaneBijkerk_happikids_summer2019_mud_sandslime_IMG_7490.jpg
Having so much fun making sand slime!

Having so much fun making sand slime!

The article is out now in the Dutch edition, summer issue. And I cannot recommend highly enough to play in mud. I may even turn it into a mud bath for myself, that will be some serious earthing!! Ha.

PiaJaneBijkerk_HappiKids_summer2019_mud_energyballs_IMG_0211.jpg

Here is the mud-inspired-but-completely-edible energy balls recipe for the article, which I made up from ingredients I had…

INGREDIENTS

1/2 cup  of almond meal
3/4 cup of pitted dates
2 tablespoons of raw cacao powder
1 tablespoon of almond butter (or any nut butter - I used peanut butter which was delicious)
1 tablespoon of coconut oil
Pinch of salt

METHOD

Place the almond meal in the food processor with the dates and coconut oil and pulse until they are nicely crushed. Add the nut butter and cacao and then mix again in the food processor. Add a pinch of salt if desired. Take a tablespoon of the mixture and roll into a ball. Continue doing this until the mixture is finished. Place the rolled balls into the freezer for an hour, then remove and store in an airtight container in the fridge.

Makes 8-12 balls (depending on how big you make them).

A big thank you to everyone who helped me on this shoot: Romain, Laly, Shona, Celia, Eliza, Narelle, Zephyr, and Luka!

With Love,

Pia xx