child's play

{new work} Do you know the wisdom of the gnomes & elves?

image003.jpg

In the latest edition of Happi Kids, looking into the wisdom of the knomes, imp, elves and other creatures of nature. what can we learn?

Elf wings, hidden in plain sight.

Elf wings, hidden in plain sight.

I loved shooting this story. It was challenging but absolutely delightful, I was lost in this world while creating it. So much fun.

Lost treasure, found in tiny boxes.

Lost treasure, found in tiny boxes.

Fairy circle, found under a tree deep in the forest.

Fairy circle, found under a tree deep in the forest.

Have you found any tiny bells and feathers? Sweet gifts from the gnomes.

Have you found any tiny bells and feathers? Sweet gifts from the gnomes.

I’ll be posting behind the scenes and directors notes in the Wandering Hearts Collective for you in coming days.

xx

Publication: Happi Kids
Published: March 2020
Photography & Styling: Pia Jane Bijkerk

{inner child} create your own colour...

58D7D927-B504-41FD-96AB-3B2EEBDD7E15.jpg

At the end of last year, I held another art workshop for 50 students in year 2 (age 8) at Laly’s school. This time, I focussed on colour and chatted to the kids about the power of colour in our lives. I was inspired by my faraway friend, artist & educator Lisa Solomon’s new book A Field Guide to Color - it is full of fantastic techniques on understanding colour through watercolour. And the paper throughout the book is ideal to apply watercolour paint, so you can do the exercises directly in the book which I love…

I took the book in and taught the children a little about Lisa’s art, what I personally love about her work, and some of her colour work techniques like Colour Meditation.

040785C0-CAFF-43B2-90EE-C3F174A92C9F.jpg

They were all very excited to be making colour! They knew the basic principles of making different colours (red + yellow = orange etc) but I wanted to stretch this a bit further, to get them to experiment, to not just take a colour from a tube and go with that but to adjust it according to their mood, and to use their intuition when creating a new colour.

9A0DE27E-1DE7-4306-B7CC-BB41824F390A.jpg

We created a few different stations in the classroom so that the kids could go from one to the other, allowing a few children at a time a few minutes at my station - the colour making station. As I mentioned, one of the many things that Lisa does is create colour meditations with watercolour, it’s a wonderful activity so I used this idea as one of the stations for the kids. At this table, they were to repeat a marking on their paper over and over again using a different coloured marker for each one. Another station I set up with a whole bunch of colour samples from the paint section of the local hardware store. These I had gathered over the previous months for my own photoshoots, as I use them to create colour palettes in my storyboarding. For this station, the idea was to look at the names of the colours to gather inspiration, and to then come up with a name for their colour that they will be creating. They came up with so many creative names!

A2B38DF7-BFFE-46BE-A981-522AEB890E7E.jpg

At my station, it was all about the mixing. It was no easy feat to manage this to accomodate 50 kids in two hours! Their excitement and gratitude though was worth every drop of sweat as I frantically prepped for each round of children. I let them choose a base colour from a group of mixing vessels I’d prepared before they arrived at the table, and then we got adding - I asked them what colour they would like to add to see what happens, and off they went. I tried my best to teach them that the more colour they added, the more it could become brown, but at the same time I also know that they need to learn this from trying themselves. Stepping back to allow their own lessons to transpire while also being available to teach them when they need it is a challenge. I have always had immense gratitude to the teachers of the world who manage this daily, in their own journey to find their own balance.

B61F2585-2817-4447-ADF5-D4C7E05F67CC.jpg
5DE09CDF-6B8A-4B7D-B2BF-F31D352AD9B1.jpg

After they’d mixed their colour, they went to the painting station to paint their colour onto a piece of paper and write the name of their colour and their name onto the paper. So. much. fun.

72A5434D-996F-49FA-9B65-22083BD7959B.jpg

Meanwhile at home, I’d been making my own colour palette for a backdrop and painting I was working on. I’ll be sharing the process in detail of developing a shoot from start to finish on the Wandering Hearts Collective in the coming week, as this process is transferrable to how I design intuitive websites for my mentoring clients as well as intuitive business practice.

79C7E92C-DDA1-4B69-8F1F-CD432C470F12.jpg

Although I hosted this workshop for children, it’s an activity I would recommend to my clients and anyone at all who is needing to connect with their intuition, creativity, and inner child.

And if you’ve been wanting to learn how to play with watercolours and deepen your knowledge of colour, then Lisa’s book is definitely for you.

With love & colours,

Pia xx


All Natural Playdough (original post from 2014)

PJB_photoplaydoughrecipe.jpg

Looks like it’s been 6 years since I’ve made playdough! This recipe is from my original blog, and Laly asked me the other day if we could make some, which we will do this week. I remember the colours being so vibrant, so I’m looking forward to trying this out again.

I thought I’d repost it here so it’s easy to find.

Here is the original post…

February 4, 2014 (Laly was almost 2 years young):

So I've been having a bit of fun making all natural play dough lately. This batch of coloured fun is my third or so experiment and I'm rather happy with it. Though I've got some ideas for the next batch which I'll share with you in case you'd like to try.

Since I want to use only natural colour, I've adapted this recipe from best recipes, minimizing quantities and introducing soaking selected ingredients to create coloured water. Here is my adapted recipe:

1 cup plain flour
1/2 cup salt
1/2 tablespoon (or so) of cooking oil (i've been using sunflower)
1/4-1/2 cup of cold, coloured water

To make the coloured water, soak a handful of your chosen ingredient (spinach for green, beetroot for deep purple, mixed frozen berries for rose/light purple) in a ramekin or glass container of 1/2cup water, preferably overnight. Strain the liquid and pop it in the fridge for a little while to make it cold, or add an ice cube.

In a large bowl, mix the flour and salt together well. At this stage if you are making yellow, add a good sprinkling of tumeric powder. Then add the cooking oil and 1/4cup of coloured water. Mix then knead until well combined. Add more water if needed to get the right consistency.

....................................................

I then put each ball of play dough into clear, recycled plastic containers and leave them in the back of the fridge. To allow them to soften slightly, I take them out about 1/2 hour before we are ready to play with them  (yes, WE - Laly and I both love playing with play dough - yesterday I made a fantastic collection of funny looking dinosaurs which Laly promptly invited all to a tiny tea party). This batch was a little crumbly when I took them out, so I just added splashes of water and kneaded them a bit more and they were perfect. Adding flour and water makes playing with it all the more fun for Laly, so I don't mind if I don't get the consistency spot on when I make them. And yes, the colours do come off ever so slightly when you play with them, but barely - and honestly, who cares? It washes off with a dab of a cloth.

The other thing I'd like to say is that I soaked beetroot skins in some water overnight, hence the gorgeous intense colour. However I didn't soak the spinach or the mixed berries but next time I will to get more intense colour, though if you like it subtle, soak for less.

My last batch of yellow and rose lasted many months - basically until the colours get all smooshed together and the ball diminishes to a tiny size, as happens when little hands get hold of it.

I hope you'll give this a try. I can't wait to try out more ingredients for more colours!  Any suggestions?

xx


new work: vitamin-rich refreshments for happi kids...

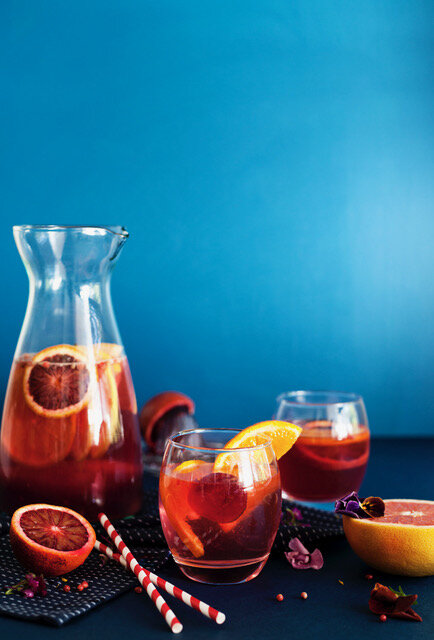
PiaJaneBijkerk__HappiKids_Winter2019_vitC_citrus_IMG_0049.jpeg

Well I need to let you know, it’s not quite new work, it’s just taken me this long to get around to posting it! This story came out in the Winter edition of Happi Kids in November, and it’s all about drinks that are focussed on the vitamin content, to boost the vitamins our kids need. It was as always, a lot of fun shooting food, and coming up with the recipes was as much fun as the rest of the production. And just for you, I’ve attached the recipes with each photograph so you can try them out, they’re also nice and easy for kids to join in making too - I have to say my absolute favourite was the carrot soup. In fact, I think I’ll make it this weekend again, it was a hit - both Laly and her friend Eloise loved it when I served up the left overs from the shoot that weekend. It’s delicious warm or cold.

Keep in mind that all my recipes are intuitive, which means you don’t need to follow them precisely - I tend to make them up as I go so you can do the same and I recommend it!

Also for this story I focussed on colour, so each recipe was as much about the vitamins as it was about the colour because colour is a powerful healer.

The first elixir above is of course, all about…

Vitamin C: dark orange/red

INGREDIENTS:

A bottle/half bottle of clear apple juice
Sparking water or plain water
3-4 citrus fruits of choice – orange, grapefruit, lemon, lime
Juice of one lime
1-2 cups beetroot juice

ASSEMBLAGE:

Place the beetroot juice into ice cube trays to freeze.
Put the apple juice, water and lime juice in a large jug.
Slice the citrus fruits and place into the jug as well as the glasses.
When the beetroot ice cubes are ready, place them into each glass and pour the drink over the ice cubes.

PiaJaneBijkerk__HappiKids_Winter2019_vitA_carrots_IMG_0065.jpeg

Vitamin A: orange

Chilled (or warm, your choice) carrot soup

INGREDIENTS:

A bunch of baby carrots, carrot tops removed or 3 large carrots, peeled and cut
½ onion
1-teaspoon turmeric powder
Drizzle olive oil
Salt
1-teaspoon honey
Coconut milk (optional)
1-2 Litres of vegetable stock

ASSEMBLAGE:

Preheat oven to 180C.
Place carrot and cut up onion on a baking tray and drizzle with the olive oil, honey, turmeric and salt – mix together so that the carrots and onions are well coated.
Bake in the oven until tender and roasted – about ½ hour.
Remove from the oven, allow to cool and then place in a blender with the veg stock – start with ½ litre of veg stock and then add as you go so you can check the consistency. Blend altogether until smooth.
Chill in the fridge and then serve! You can add a dash of coconut milk to serve if desired.  Bunny face created with micro herbs and edible flowers.
Makes 2-4 (depending on whether you serve it as an entrée or main)

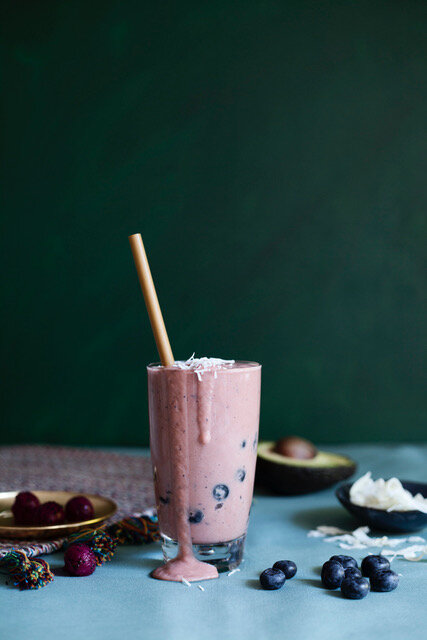
PiaJaneBijkerk__HappiKids_Winter2019_vitE_avocado_IMG_0087.jpeg

Vitamin E : purple

 INGREDIENTS:

½ avocado
Handful of baby spinach  - optional
½ cup coconut milk (or try other non-dairy milks)
1 cup frozen blueberries
2 teaspoons honey
Beetroot powder – optional (makes it more purple)
¼ teaspoon cinnamon
1-tablespoon nut butter – optional

 ASSEMBLAGE:

Put all ingredients in the blender and blend until smooth. To make it thicker, you can add ice, to make it less thick, you can add more coconut milk.

˙˙˙˙˙˙˙˙˙˙˙˙˙˙˙˙˙˙˙˙˙˙˙˙˙˙˙˙˙˙˙˙˙˙˙˙˙˙˙˙˙˙˙˙˙˙˙˙˙˙˙˙˙˙˙˙˙˙

If you’re child is not keen on eating anything green, this recipe below is great, as the colour is so vibrant and making the animal faces on top makes it playful. I recommend starting with very small bowls, even if it’s 3 big spoonfuls of the smoothie and then they can enjoy the fruit shapes. Even if they only have a small amount, you can then gradually increase the amount of smoothie you put in the bowl when you make it again. Let them play with the fruit to make faces. You can make one of the bowls up for them to see (that one can be yours), so they can see the face on top for inspiration, then let them make up their own with their own bowl. Kids love assembling, so this is a great recipe for that.

PiaJaneBijkerk__HappiKids_Winter2019_vitK_spinach_IMG_0071.jpeg

Vitamin K: green

INGREDIENTS:

Bunch of kale
Bunch of baby spinach
1 banana
A handful of grapes
½ cucumber
½ lime  - juice
1 tsp. psyllium husk (optional)
½ cup water
1/2 cup apple juice

ASSEMBLAGE:

Blend on high until smooth, place in bowls and decorate with pieces of cucumber, lime wedges, or any left over fruit to make green monster faces.

˙˙˙˙˙˙˙˙˙˙˙˙˙˙˙˙˙˙˙˙˙˙˙˙˙˙˙˙˙˙˙˙˙˙˙˙˙˙˙˙˙˙˙˙˙˙˙˙˙˙˙˙˙˙˙˙˙˙

This one is another hit! Of course, it’s got chocolate. But it’s fantastic for adding some extra powders for added minerals, see below…

PiaJaneBijkerk__HappiKids_Winter2019_vitB_nuts_IMG_0095.jpeg

Vitamin B: brown/chocolate

INGREDIENTS: 

Small handful of cashews
Small handful of almonds
A teaspoon sunflower seeds
1 medjool date
½ banana
1 tablespoon cocoa powder or cacao
Small handful of baby spinach leaves
1 tablespoon unhulled tahini
1-tablespoon peanut butter
1-2 cups rice milk
Sprinkling of buckinis - buckwheat for the top

ASSEMBLAGE:

Soak the cashews overnight in water – simply put the cashews in a glass jar, and cover with water and leave on the bench. Do the same with the almonds and sunflower seeds.
Put all ingredients into the blender and blend on high until smooth and creamy.


This is a great recipe to add any extra powders to boost the immune system – you could add maca powder, zinc, pea protein, slippery elm, psyllium husk etc.

I hope you try some of these recipes and for the full story, it’s in Winter edition of Happi Kids (the issue before the latest).

˙˙˙˙˙˙˙˙˙˙˙˙˙˙˙˙˙˙˙˙˙˙˙˙˙˙˙˙˙˙˙˙˙˙˙˙˙˙˙˙˙˙˙˙˙˙˙˙˙˙˙˙˙˙˙˙˙˙

Production, styling & photography: Pia Jane Bijkerk
Publication: Happi Kids for Happinez

My next post is going to be all about the power of colour!

xx

PS There is a new post on Patreon too, for the Wandering Hearts Collective, and another delicious recipe there for this month as we strengthen our immune systems for what’s happening in the world. I’ll be writing more about what I’m doing this year on Patreon soon X