pia's photos

{new work} VISUAL ODE TO THE CIRCLE...

I do not know how this photographic feature slipped by without being shared with you (such is life over the past 2 years!) - it was featured in issue two for 2021 of Happinez. It is my favourite of all time & marks a very important change in my life - it is the first shoot in my new hometown, a ten year long goal actualised. To receive this brief from Happinez in the first month of moving up to the Northern Rivers was wonderful and felt serendipitous.

The issue is all about silence - harnessing the power of silence and stillness, listening deeply, listening within. And for this I was asked to focus on the circle, being the symbol of silence and stillness. The circle is also the hallmark of Happinez. There is always a circle on each cover and this story honours the circle as the center of silence. As Albertine wrote to me in our briefing, “Inside the circle it is quiet. The more you go to the middle, the more quiet it is. The circle is a symbol for eternity, no beginning and no end. A perfect nothing.”

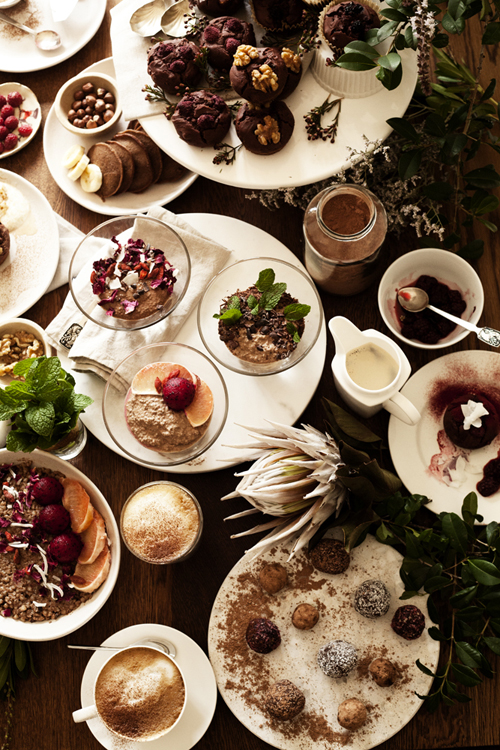
I had so much artistic freedom with this shoot, playing with the elements of earth, fire, air and water and finding ways to express the circle & stillness. I wanted each photograph to be a work of art.

The first image above was harnessing the stillness in sound - using the Tibetan singing bowl as my inspiration. I just loved how it played off the texture of the rich soil and beach grasses.

The moon and planets were my inspiration for the second image above. The well-worn studio floor was my backdrop, with it’s beautiful paint tin rust stains. The plate and bowl are by Made of Australia from Shack Palace, and the Black Clay ball soap is from my favourite soap makers in the world, Est Australia - I have been buying their soaps and carrying them with me around the world for 20 years! I stocked their incredible soaps in my homeware store all those years ago, and have never stopped ordering from them as a customer since.

For this photograph I place a gorgeous handmade cast iron plate in the centre with seaweed from my local beach. I sprinkled sand on the dark surface along with dried flowers from my aged flower collection and inside the jar is gold leaf paint, sitting on the surface of the water. There are layers to this work and when you look closely you may see them.

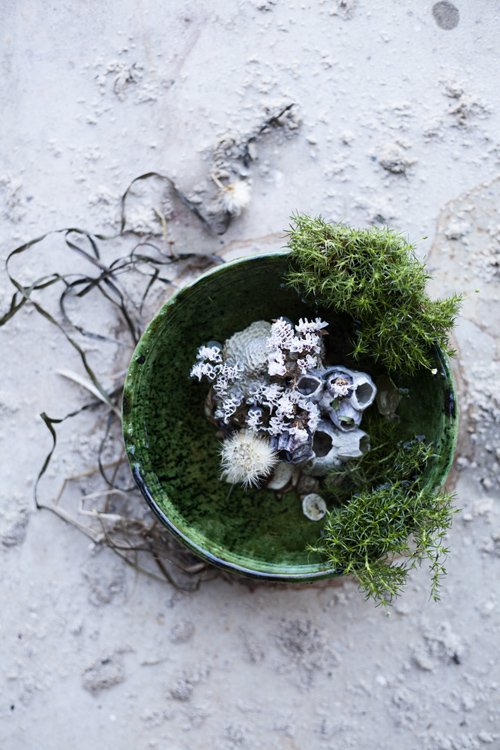
Element: Water. I wanted to make a dream-like rock pool. I was inspired by my visit to Shelly beach which has so many beautiful rock pools, so I wanted to create something like this - the idea of looking into this water hole and wanted to dive into it. Laly and I call it the fairy pool. And this special creation became our outdoor table centrepiece for the following months, it was beautiful to look at and play with, contemplating which creatures - both earthly and enchanted - came to visit the fairy pool during the night hours.

Again I photographed this on my concrete studio floor, adding sand from our beach, and also some seaweed. The bowl I found a few years ago - someone had discarded it on the side of the road. So many of the most wonderful pieces in my home have come from the side of the road. The green colour of this bowl is gorgeous, I love it. Inside the bowl are barnacles, shells, dried flowers and moss. Floating on top of the water are a couple of dandelion heads - I love the symbol/message of the dandelion and also it’s circular/round form.

Element: Earth. This vine of dried grass was growing inside my studio, near the door. I absolutely loved the idea of shaping it into a circle form. I wanted an earth element but something surprising - I didn’t want to make a wreath or mandala which felt a bit obvious, and I love how this turned out - so simple but it took me a long time to try to get it right. The vase is handmade, it was given to me some years ago by my friend Zoë.

Element: Fire. This photograph for me weaves together my surroundings and heart space. I wrote to Albertine in my description for the photograph, “The clay dishes are very special - they were made by my friend, local artist Natalie Wilkin. Nat is one of the main reasons I moved up here, she is my closest friend, and she is incredibly talented. She makes a range of elemental wares, and this is part of her new collection. Here is her website. Some of the clay for these pieces was sourced directly from her home, a sacred piece of land in Moorang-Moobar Country.

I hope you enjoy these special photographs and the creation stories behind each of them.

With love,

Pia x

New Work: Mud Play for Happi Kids

Laly in her mud pit making a Mud Café…

Laly in her mud pit making a Mud Café…

PIAJANEBIJKERK_HAPPIKIDS_MUD_2019.jpg
A diary of a worm, something we had a lot of fun working on together and included playing with real worms found in the garden.

A diary of a worm, something we had a lot of fun working on together and included playing with real worms found in the garden.

In April this year I got one of the most wonderful photographic story commissions for a magazine I’ve ever had… when I read the phrases in the email “make things with mud”, “kids getting dirty”, “do you love the subject?” I barely held back my excitement and I was quick to reply YES! It ticked all the boxes for me and I couldn’t wait to schedule it in & get thinking on what I could create for this story for the summer issue of Happi Kids.

Do you remember when Laly was around 2 years old, I made her - by hand, spending no money (yes I’m proud!) - a sandpit in our back garden? Here is the post to jog your memory. Well, she’s now a regular beach goer, no longer afraid of the vastness of the ocean and loves ‘surfing’ on her body board. She’d outgrown her mini backyard beach so, inspired by the story for this shoot and in need of the perfect location, I turned the sand pit into a mud pit! I dug out the sand, and collected some buckets of dirt from the back area where our first chickens used to roam (we now have chickens again, but that’s another post for another time! We may live in the city, but that hasn’t stopped us from creating a mini farm it seems). I cleared the area around the pit and planted a few hardy flowers and pretty palms. I needed to create a space big enough for a couple of kids to play in, as well as a painting area. It was a lot of fun to build this set, gathering vintage kitchenware for the mud cafe, and mixing mud with beetroot, spinach and turmeric to create mud paint. I spent a glorious hour or two by myself making the tiny mud house (inner child meets grown up job - the best)…

PiaJaneBijkerk_HappiKids_summer2019_mud_house_laly_IMG_7430.jpg
PIAJANEBIJKERK_HAPPIKIDS_MUD_2019_1.jpg

I had three wonderful young models for this shoot. With the fabulous production assistance from my friend Celia, she found two boys from Laly’s school, Zephyr and Luka, who came over with their mums Eliza and Narelle, one afternoon and basically hung out in the mud for 3 hours while I snapped shots of them playing. I only needed 3 hero shots from the boys, but there were many more created, they had so much fun and it was pure joy to capture them in action. I don’t think they could quite believe that this was a real job, and all they had to do was play and cover themselves in mud! Shona was my styling and photography assistant for the afternoon, so it was certainly a relaxed and joyful shoot…

Zephyr painting with mud!

Zephyr painting with mud!

Luka and Zephyr following my instructions to get dirty!

Luka and Zephyr following my instructions to get dirty!

The boys making ‘dirty denim’ with some op shop denim clothes I sourced for the shoot.

The boys making ‘dirty denim’ with some op shop denim clothes I sourced for the shoot.

Luka loved making mud ice creams.

Luka loved making mud ice creams.

Zeph covered in mud and pretty happy about it!

Zeph covered in mud and pretty happy about it!

At the end of the shoot, while Zephyr’s mum Eliza was hosing him down, I saw him look up at his mum and say “I will never forget this day!”. My heart exploded.

The next day was Laly’s turn, and she took on her role with not just enthusiasm but surprising skill, as she doubled as my photographic assistant as well, helping me set up certain shots and gathering materials, and restyling the props when needed. This is the first time she’s worked with me or seen me work as I have only ever brought her with me to a shoot once - when she was 6 months old, and it was a disaster, so I never did it again! Until now, at 7 years of age. She was so great, and I think I may have myself an ongoing assistant for as long as she finds joy in it! I’ve noticed she’s a natural behind the camera actually - she took a video of her friend the other day singing, and I couldn’t believe how still she kept the camera and how she followed her friend around, patient and mindful of how she was placed within the frame - there were even natural light flares from the sun, it was like a professional film, I couldn’t believe it! I’ve never taught her so I was pretty blown away - let’s just say she gets that from me, because as we know, it’s not one of Romain’s many talents.

Mud sandwich anyone? A bit of stale bread and some pretend ‘micro herbs’, yum!

Mud sandwich anyone? A bit of stale bread and some pretend ‘micro herbs’, yum!

PiaJaneBijkerk_happikids_summer2019_mud_sandslime_IMG_7490.jpg
Having so much fun making sand slime!

Having so much fun making sand slime!

The article is out now in the Dutch edition, summer issue. And I cannot recommend highly enough to play in mud. I may even turn it into a mud bath for myself, that will be some serious earthing!! Ha.

PiaJaneBijkerk_HappiKids_summer2019_mud_energyballs_IMG_0211.jpg

Here is the mud-inspired-but-completely-edible energy balls recipe for the article, which I made up from ingredients I had…

INGREDIENTS

1/2 cup  of almond meal
3/4 cup of pitted dates
2 tablespoons of raw cacao powder
1 tablespoon of almond butter (or any nut butter - I used peanut butter which was delicious)
1 tablespoon of coconut oil
Pinch of salt

METHOD

Place the almond meal in the food processor with the dates and coconut oil and pulse until they are nicely crushed. Add the nut butter and cacao and then mix again in the food processor. Add a pinch of salt if desired. Take a tablespoon of the mixture and roll into a ball. Continue doing this until the mixture is finished. Place the rolled balls into the freezer for an hour, then remove and store in an airtight container in the fridge.

Makes 8-12 balls (depending on how big you make them).

A big thank you to everyone who helped me on this shoot: Romain, Laly, Shona, Celia, Eliza, Narelle, Zephyr, and Luka!

With Love,

Pia xx

DUST by Organic Merchant...

Chocolate Nut Muffins by Organic Merchant, Photographed by Pia J B.

Chocolate Nut Muffins by Organic Merchant, Photographed by Pia J B.

It’s no secret that I’ve been an enthusiast of naturopath Chalimah Jeanne’s organic teas for many years. I first came across her collection when we moved to Sydney in 2011, while wandering through Paddington Markets. Chalimah has such a beautiful energy and incredible wealth of knowledge, and I found myself coming back for more. For those who’ve been around for a while, you might recall I featured her teas in a story I wrote for Country Style back in 2013, and have continued to use her teas over the years for styling projects and as gifts for clients.

PJB_ORGANICMERCHANT_DUST_IMG_6696.jpg

Last year I had the pleasure of collaborating with Chalimah to photograph both her new packaging (you’ll see these sensuous images soon) as well as the recipe cards for her new Dust Collection. Dust is a range of healthy & delicious raw cacao infusions, designed to improve mental focus and physical performance. There are six infusions in the range: Super, Sex, Soothe, Spark, Shine, and Spirit. Each one is designed specifically to enrich the characteristics we need to strengthen within us.

Chalimah wanted to create some beautiful recipe cards that show the many ways you can incorporate the infusions, as they are not only wonderful as warm elixirs but also scrumptious in pancakes, muffins, smoothies and popsicles. So one morning, she made an incredible array of some of her favourite foods and I came with my camera to photograph them all on her long wooden dining table.

Would you like to see some of the photographs? I took many, it was such a beautiful setting. And there was a gorgeous natural coppery light that came through, infusing everything with a warmth and glow. Here are a few of my favourites…

PJB_ORGANICMERCHANT_DUST_IMG_6825_diptych.jpg
PJB_ORGANICMERCHANT_DUST_IMG_6556.jpg
PJB_ORGANICMERCHANT_DUST_IMG_6825_diptych_1.jpg
PJB_ORGANICMERCHANT_DUST_IMG_6494.jpg

Chalimah has been sharing a few of her delicious recipes on instagram and on her website, and I’ve included a few here for you. They are all so yummy…

PJB_ORGANICMERCHANT_DUST_IMG_6597_nourishbowl.jpg

Nourish Bowl…

Ingredients:

  • 1 cup buckwheat hulls

  • 2 cups plant mylk

  • 4 heaped tsp DUST infusion of your choice

  • 2 tbsp chia seed/flaxseed

  • 1/2 cup fruit – currants/raisins (optional)

How to assemble:

  1. Combine ingredients into a bowl and soak overnight to allow hulls/seeds to soften.

  2. Once soaked, transfer to saucepan and cook over low heat for 15-20 minutes or until thick and creamy. Add more mylk or water if needed.

  3. Serve into bowls topped with your choice of suggestions from the list below.

Suggestions to add…

  • Grated apple with cinnamon

  • Fresh figs with honey and walnuts

  • Poached pears with vanilla

  • Pomegranate jewels and pistachios

PJB_ORGANICMERCHANT_DUST_IMG_6703_cacaopancakes.jpg

Cacao Pancakes…

Ingredients:

  • 1 cup buckwheat flour

  • 4 heaped tsp DUST infusion of your choice

  • 1 tsp baking soda

  • 2 tbsp coconut sugar (optional)

  • 1 to 1.5 cups plant mylk

How to assemble:

  1. In a large bowl, combine all the dry ingredients and stir well.

  2. Whisk in mylk to create a batter.

  3. Set stove top to medium and add butter/coconut oil.

  4. Gently pour 1/3 cup of batter into pan using ladle/large spoon to create pancakes roughly the size of an orange.

  5. Flip pancakes over once bubbles have risen on the surface.

  6. Set / stack cooked pancakes on wire rack or plate and continue until batter is finished.

PJB_ORGANICMERCHANT_DUST_IMG_6497_nutmuffins.jpg

Chocolate Nut Muffins…

Dry ingredients:

  • 2 cups buckwheat flour

  • 1 cup ground seed/nut meal

  • 1/4 cup coconut sugar

  • 1/4 cup DUST infusion of your choice

  • 1 tsp bi-carb

Wet ingredients:

  • 3/4 cup plant mylk

  • 2 eggs or chia egg replacement*

  • 2 ripe bananas mashed

  • 1/2 cup hazelnuts/frozen berries

  • 1/2 cup coconut oil/butter melted

*Chia egg replacement = 1 tbsp chia seeds + 3 tbsp of water. Combine and set aside for approx. 10 minutes.

How to assemble:

Preheat oven to 180 ̊C.

  1. In a large bowl, combine all the dry ingredients and stir well.

  2. In a smaller bowl, combine all the wet ingredients and stir well.

  3. Add wet mixture to the dry ingredients and combine (It’s OK if the mixture is a little lumpy).

  4. Spoon mixture into muffin tray or baking cups.

  5. Cook for 20-25 minutes or until skewer comes out clean.

  6. Cool in tray for 5 minutes then transfer to wire rack.

Store in airtight container at room temperature for up to 3 days. 

PJB_ORGANICMERCHANT_DUST_IMG_6775.jpg

There are more wonderful recipes at Organic Merchant so please head on over, along with more details about the full Dust range and where to purchase them. And Organic Merchant’s instagram is here.

Enjoy!!

With Love,

Pia xx


New Work: Begin your day the Ayurvedic way for Happinez...

Step One: an early walk in nature

Step One: an early walk in nature

This was another wonderful story of images for Happinez magazine, which I photographed in February here in Sydney. The brief was to create six photographs featuring each step of how to start the day with Ayurvedic rituals. I hadn’t realised until the magazine came out that the story was a feature for Bianca Fabrie’s new cookbook Holy Happy Belly - Bianca and I had worked together in Amsterdam a few times for various photoshoots when I lived there - along with being an Ayurvedic therapist she is also an incredible makeup artist - so it was such a great surprise to know we had collaborated on this without knowing it, from across the seas!

A couple of weeks before the shoot, I made a call out on social media for a model for two of the shots, but it was an encounter in my local cafe with my friend & fellow photographer Gaby who was dining with her dear friend & photographer Sam, that lead to Sam becoming my model for the shoot the following week. It was such a lovely morning, I took Sam down to a small beach on the bay near my home. The light was incredibly subdued, as it turned out there had been a fire of sorts in the area the night before which left a strange golden glow over the sky. Shooting with Sam was so easy as she is a photographer herself so she understood the process and needed little direction, it was such a treat to hang out together and get to know her through this experience. Thank you Sam!

The full story is in Issue Number 3 for 2019 available in The Netherlands out now. Continue on below to find out more about the creative process and a brief understanding of each ritual.

Step Two: Nasal Rinse

Step Two: Nasal Rinse

I really wanted to find a beautiful neti pot for this, and I went on quite the hunt across Sydney, searching Indian and wellness shops. I cannot remember where I found this one now! I think it was in Dr. Earth on King St, in Newtown. As soon as I saw it I knew it was the one - most of the neti pots I’d found were ceramic and ‘clunky’, this one being copper and slim was definitely the pick. Because really, nasal cleansing isn’t appealing, is it? At least this one would inspire us to try it!

Step Three: Dry brushing

Step Three: Dry brushing

These brushes were also from Dr. Earth, and I made the hand cloth from a vintage silk scarf. I have thoroughly enjoyed adding this ritual to my morning routine - I use the large brush for my body and the small one for my face before I hop in the shower each morning. It gets the skin tingling in the best of ways, I can feel my skin waking up to the day.

Step Four: Self massage

Step Four: Self massage

I wanted to create a rich, warm & nurturing set for these ideas, so I used the deep greens from the moodboard as my main backdrops, varying texture and hue as well as incorporating found foliage to give a tropical feel - a little nod to India. For this shot, I actually used one of my “Where Is My Heart?” photographs from the diptych as a surface, here is the photograph in situ in my studio to jog your memory…

PJB_studio_IMG_6291.jpg

…in a moment of inspiration, I took it off the wall and laid it on the table, and instantly loved the effect of the soft focus flora. I also loved the grain of the paper, being cotton rag, it soaked in the light at the same time as creating a dreamy effect. Instead of a flat surface behind the bottles I created a foliage wall, building it up until it felt lush and layered. Those two little dark bottles of wonderment in the front are gifts from my beautiful friend Midnight Blue, and I cannot wait for her to release them into the world for everyone to enjoy, she is almost ready I am told! I will be one of the first people to share this news with you.

Step Five: Belly breathing

Step Five: Belly breathing

Sam is wearing a kimono from Fabrik Store (gifted to me some years ago by Gaby!), and the nail colour is wanderlust from Sienna Byron Bay, the ring is from my jewellery box, a slice of lapis.

Step 6: Green Smoothie

Step 6: Green Smoothie

This turned out to be my favourite photograph for the story. Again using '“Where Is My Heart?” as the surface, palm fronds for texture along with fresh berries and sprouts, it came together beautifully. I made the smoothie moments before I took the shot - setting up the glasses in position first. I love the layering of the ingredients in the glasses. The gold metal straw is from one of my favourite cafes in Sydney, Orchard St Cafe.

As I’ve been writing this post I’ve realised, with the exception of the nasal rinse, that I’ve been incorporating these rituals each morning since this shoot. The smoothie is something I’ve been making for some time, an incredibly healing recipe created by Midnight Blue, and I’ve been walking most mornings, along the water, after dropping Laly off at school. The dry brushing is a new addition since the shoot, and I strive to do 20 minutes of meditation each day. Self massage is also something I’ve done for many years. So yes, I would agree that these are a wonderful way to start your day the Ayurvedic way!

For more information, check out Happinez, Nummer 3 2019 along with Holy Happy Belly by Bianca Fabrie.

With love,

Pia xx

Photography & Styling: Pia Jane Bijkerk
Magazine: Happinez, Nummer 3 2019